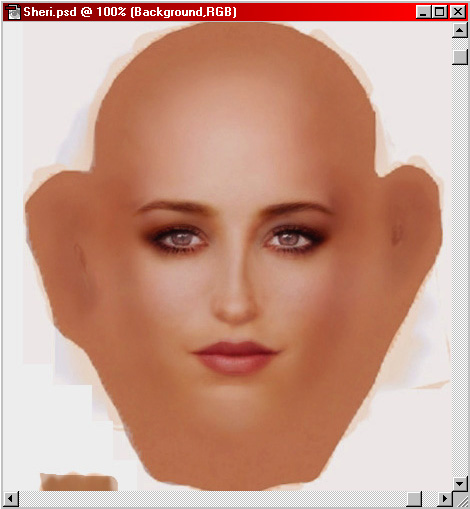
Open the female texture map in Photoshop and "zoom-in" so the face fills your work space (on a 800x600 screen, you should be able to zoom-in to 100%). For this tutorial, I will be using Sheri's texture map. Here are the "before" and "after" pictures: Open the female texture map in Photoshop and "zoom-in" so the face fills your work space (on a 800x600 screen, you should be able to zoom-in to 100%). For this tutorial, I will be using Sheri's texture map. Here are the "before" and "after" pictures:
 |
 |
| Sheri's face without make-up. |
Sheri's face with make-up. |
For any beginners (or nitpickers), Sheri is not wearing her glasses because they are a separate 3-D object which are not part of the texture map.
We will be doing all of our "make-up coloring" on a separate layer, so, in the "Layers Palette", click the "Create new layer" button.
Next, name the layer something unique (for example, "Face Makeup"): in the "Layers Palette", double-click on the new layer (probably called "Layer 1"). In the "Layer Options" dialog box, type in the new name. For now, be sure the "Opacity" is set to 100%, the "Mode" is set to "Normal", and the "Blend If" should say "Gray". Click the "OK" button when done.
We will use the paintbrush tool for our coloring since it smoothes the edges: In the "Tools Palette", select the "Paintbrush Tool".
In the "Brushes Palette", select a brush size between 20 to 35 pixels- adjust to suit your taste.
We will be coloring the "eye shadow" first:
In the "Swatches Palette", select a color (in this example, I am using Blue, but you can use any color you like). Try to select a "solid" color- not too light or not too dark. Experiment with different colors to get the effect you like.
Paint in the area between the eye and the eyebrow (where eye shadow should normally be applied). Don't worry about being perfectly exact- we will refine it later.
Note: it will look like you are coloring over your texture map- this is normal. All the colors will be blended in a later step.
|
Next, we will color under her eyes:
Paint in the area between the mouth and the eyes. As before, don't worry about being perfectly exact- we will refine it later.
Optional: adding more color to her lips. You can actually do this step two different ways:
You can continue to use the color Red and paint over her lips, -or-
You can repeat the above steps: create a new layer, rename the layer (in this case, just "Lips"), and color the layer. (In this example, I continued to paint with the color Red.)
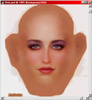
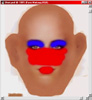
Your character's face should look like this screen shot:
|
(Yes, I know the red color is covering her nose and that, normally, this makes women "look like Rudolph" (as one reader wrote), but this is just an example of a technique you can use. We'll worry about "realism" later.)
If you were to use the texture map now, your character's make-up would look something like the character Mimi on The Drew Carey Show. If this is the look you are after, you can stop here. I can't imagine your Poser character would be too happy about this, so let's continue:
We need to lighten and blend the sharp colors into the existing texture map: go to the "Layers Palette" (the "Face Makeup" layer should still be selected) and go to the "Opacity" control. Move the slider down until the colors become blended- adjust to suit your taste. (In this example, I used a value of "10%".) Your texture map should now look something like the screen shot at the top of the page: "Sheri's face with make-up".
Optional: what to do if the colors are too dark or just aren't "right".
You can either paint over the existing colors, -or-
Delete the colors you don't like by deleting that part of the layer. (Use the marquee and lasso tools to select what you don't want and press the "Backspace" key to delete), -or-
Delete the entire layer and repeat the previous steps. (Drag the "Face Makeup" layer to the trash can icon.)
|
When you are satisfied with the texture map, go to "File" > "Save" or "Save As...". You can choose any file format, but be sure to save the file in "Photoshop" format if you plan on working on it later. (See the General Tips & Information page for a brief discussion about file formats.)
Start Poser and open/ add your character. (It's probably obvious, but I'll mention it anyway: be sure you are using a P4 female character or the texture map won't fit correctly.)
Change the texture map to the file we just saved. (Go to "Render" > "Materials..." > (your character) and, under "Texture Map", click the "Load" button. "Open" the texture map file, and click the "OK" button to use it.)
Render your scene to see how the texture map looks on your character. (Go to "Render" > "Render".) Hint: you may want to switch to the "Face Camera" to get a better look at the texture map.
If everything looks good, you're done!
|
Optional: If you are completely satisfied with the texture map (you've finished working on it in Photoshop and it looks good on your character), you should switch back to Photoshop, do a "final" save, close the file, and close Photoshop (if you want).
|